
Mastering DevOps: Streamlining MuleSoft Projects with Reusable GitHub Actions

Introduction
MuleSoft champions the principle of designing and building APIs with reusability at its core. However, this isn't a novel concept exclusive to MuleSoft. The programming world has celebrated reusability for decades, evident in the architecture of microservices, object-oriented programming, and modular design patterns. Transitioning to DevOps, reusability finds its place in automation tools. GitHub Actions stands out in this regard, offering unparalleled automation capabilities tailored for MuleSoft projects. This post will delve into building reusable GitHub Actions Workflows for MuleSoft, optimizing your development pipeline.
The Challenge of Distributed Workflows
Imagine a scenario where each MuleSoft application maintains its own unique copy of a workflow. Now, consider the effort required to update the GitHub Actions workflow across every single repository, even for the most minor of changes. Such a distributed configuration, as depicted below, introduces several challenges:
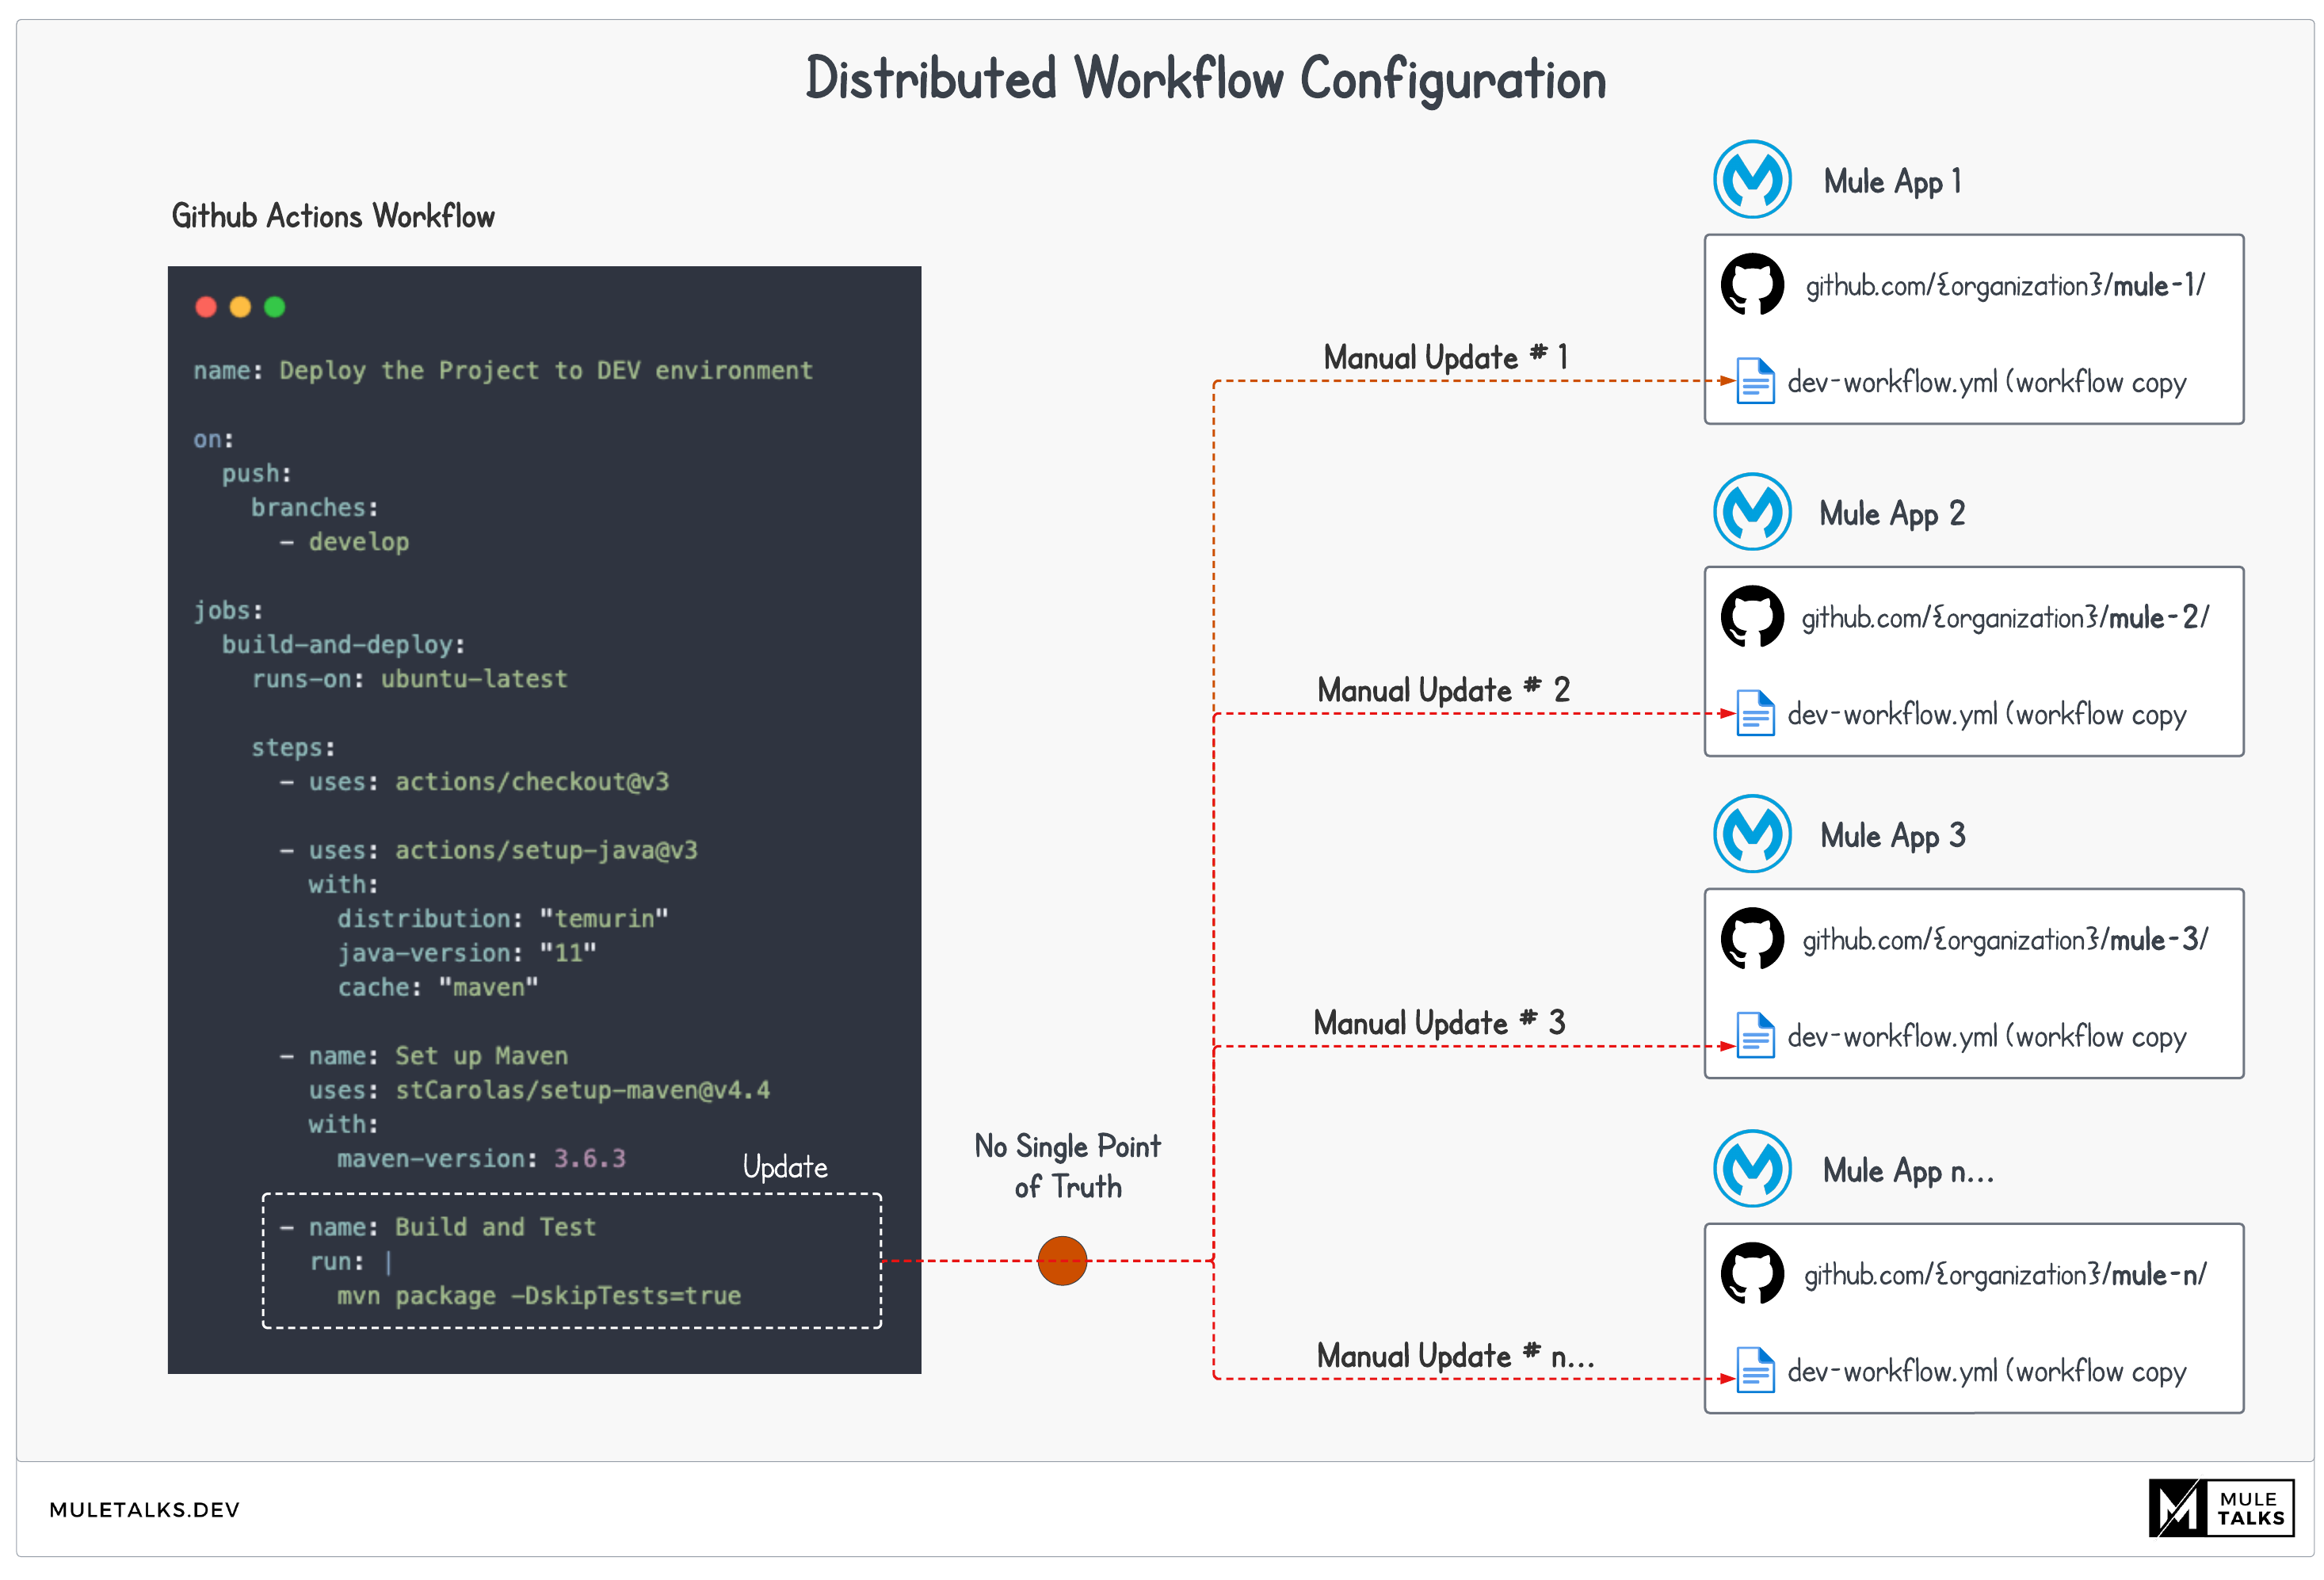
Security Risks: Multiple workflow copies amplify the risk of security inconsistencies. A single security patch, if required, must be meticulously applied across each individual workflow.
Human Resource Inefficiency: Managing multiple distributed workflows demands significant time and attention from your development team. Each unique workflow requires individual configuration, testing, and deployment. This repetitive and fragmented approach not only consumes valuable developer hours but also increases the likelihood of oversight and errors.
Troubleshooting Complexity: Identifying issues becomes a daunting task in a distributed setup. A centralized workflow, in contrast, offers a clear point of reference.
Lack of Standardization: Individual workflows can lead to variations, as different teams or developers might introduce their own customizations.
Collaboration Challenges: While a centralized workflow fosters collaboration, distributed workflows can inadvertently promote isolated efforts.
Centralized Configuration: The Path to Efficiency
Centralizing and your GitHub Actions workflows emerges as the clear solution to the challenges posed by distributed configurations. By adopting a single, reusable workflow, you can ensure uniformity, security, and efficiency across all MuleSoft applications.
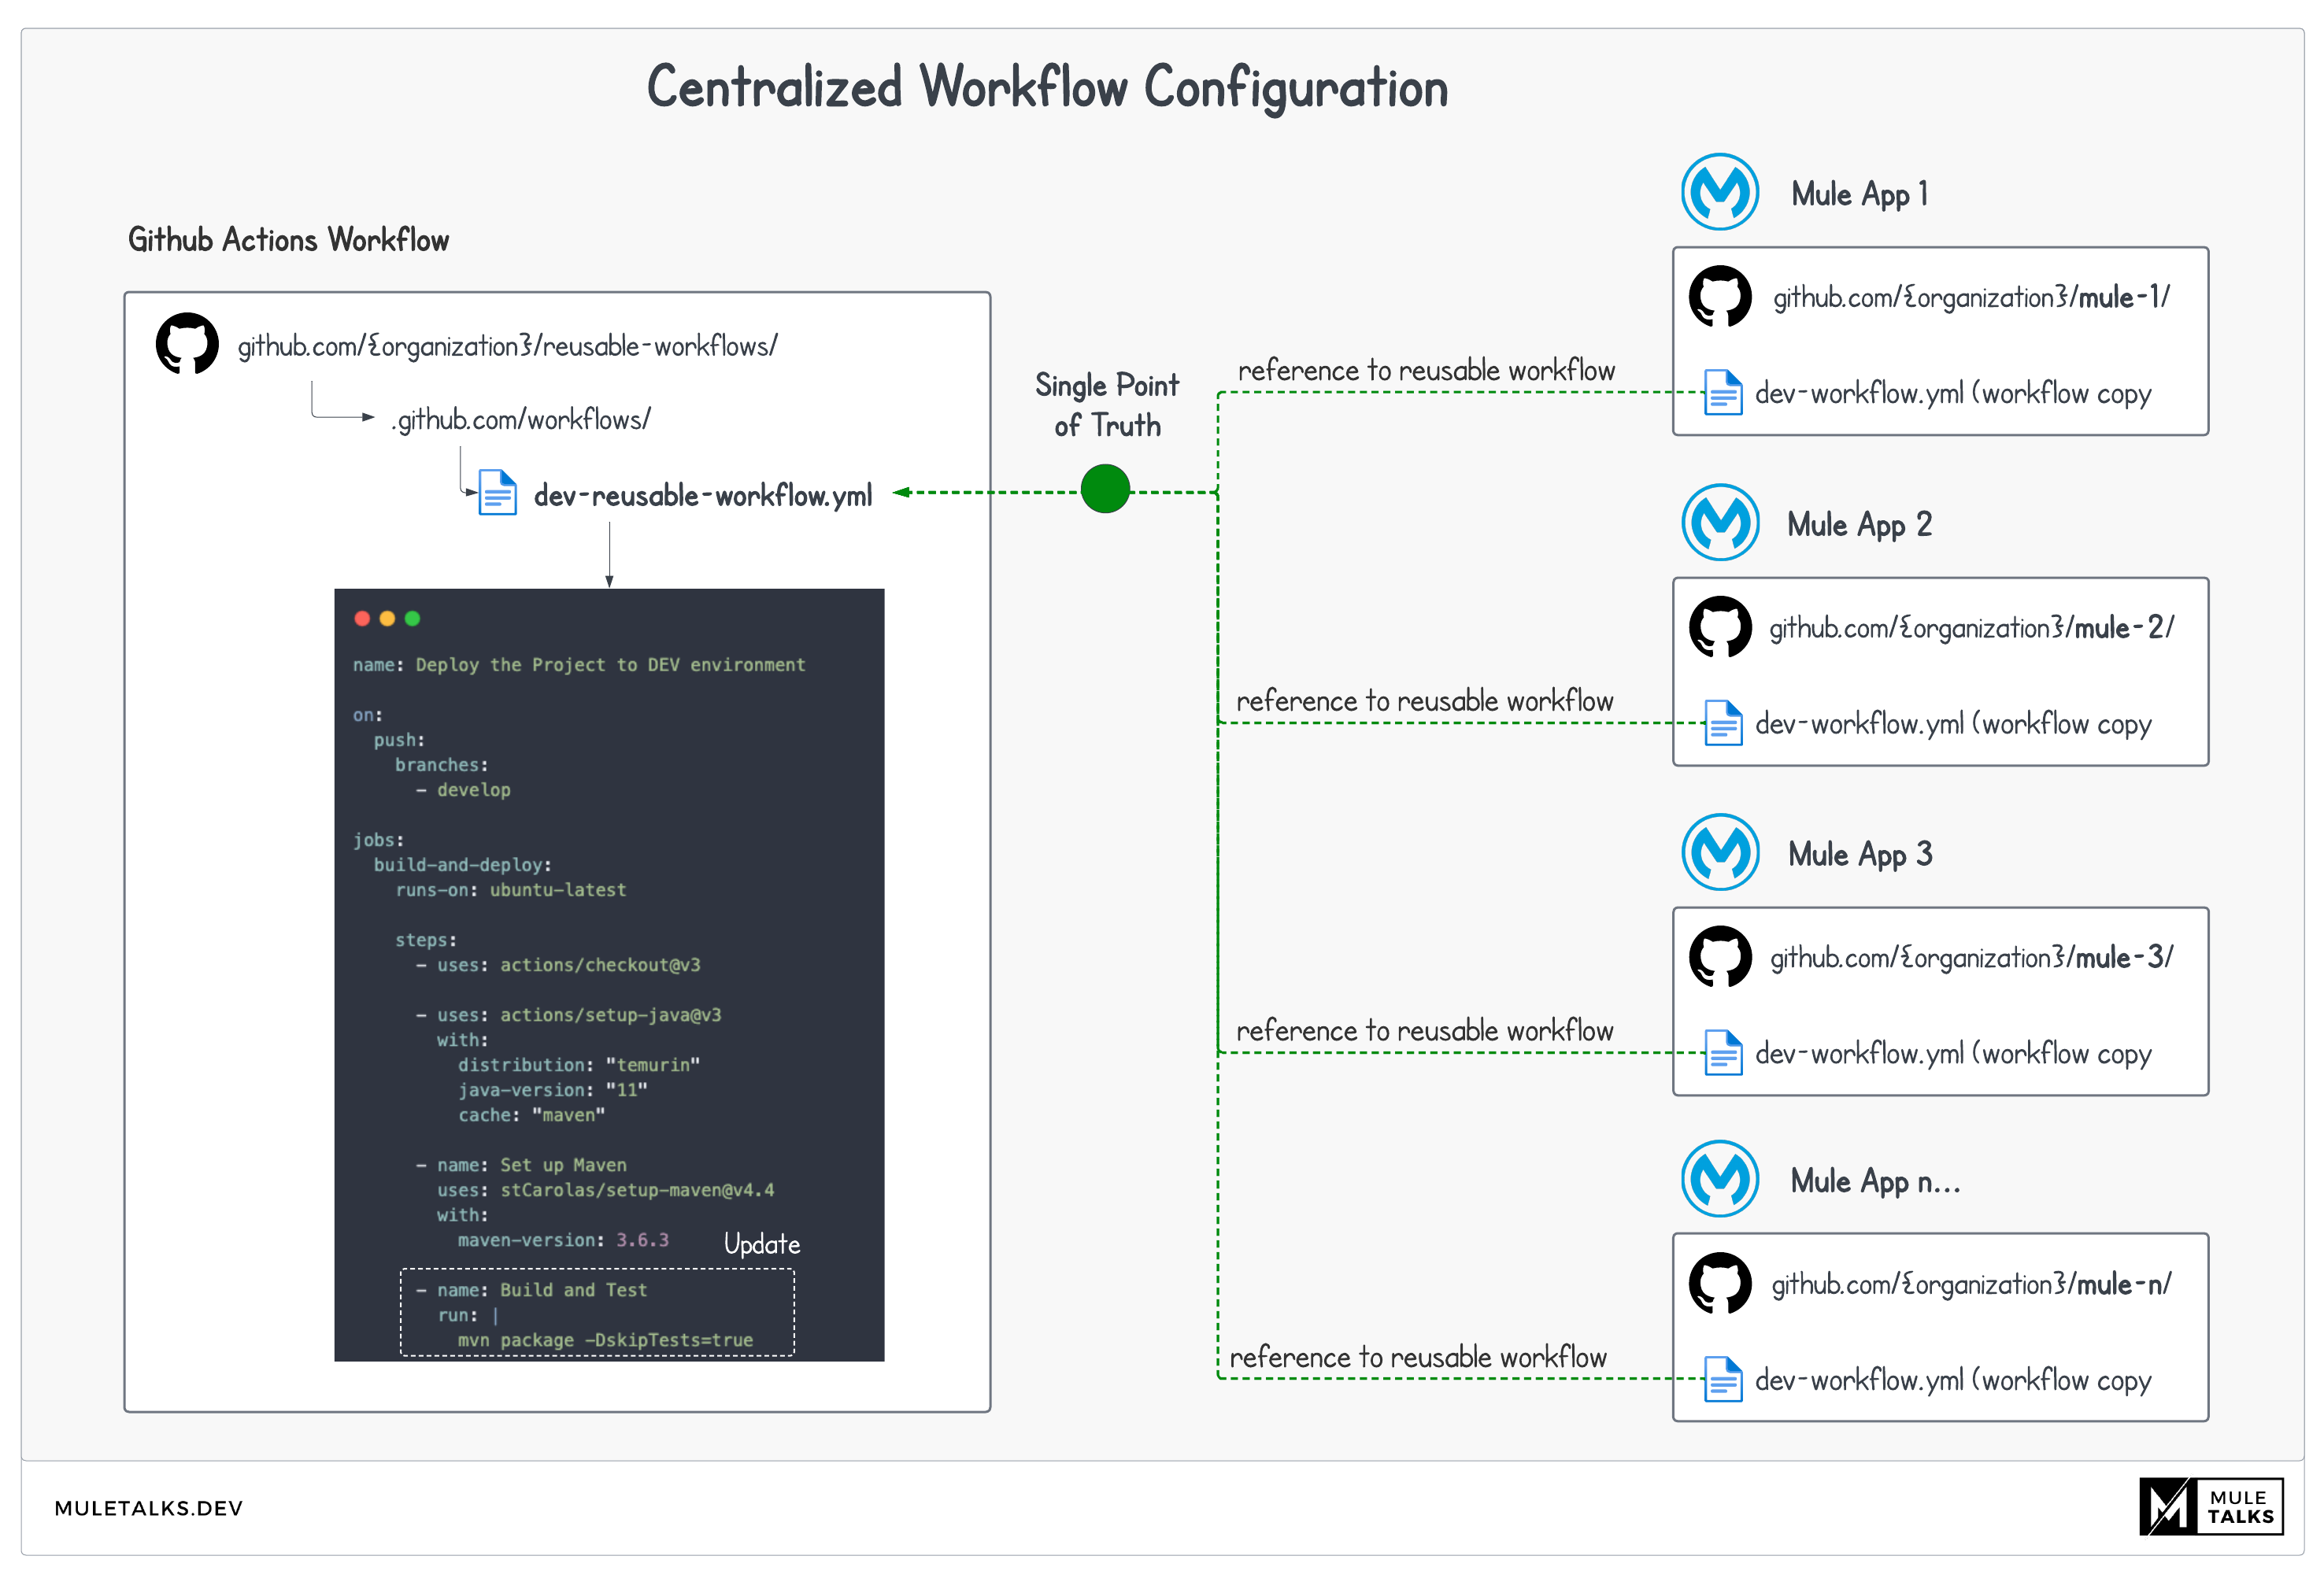
Unified Updates: A single change or update to the workflow reflects across all applications, ensuring uniformity.
Enhanced Security: A singular configuration point minimizes security vulnerabilities.
Human Resource Optimization: Centralizing your workflow means your development team sets up, tests, and manages just one main workflow. This not only reduces the time spent on repetitive tasks but also ensures that the team can focus on refining and enhancing a single, unified process.
Standardization: A unified approach ensures consistent standards and practices across applications.
Collaborative Development: Developers can collaboratively refine a single workflow, promoting shared knowledge and best practices.
Implementing a Centralized GitHub Actions Workflow
Prerequisites/Assumptions
Before diving into the implementation of a centralized GitHub Actions workflow for MuleSoft projects, ensure you're equipped with:
GitHub Knowledge: Familiarize yourself with GitHub repositories, actions, and workflows. If you’re new to GitHub Actions, the official documentation is a great starting point.
MuleSoft Project Structure: A standard MuleSoft project structure, including a configured POM for CloudHub deployments, is essential. If you're starting from scratch, consider using our example.
Access Rights: Ensure you have the necessary permissions to create and manage repositories on GitHub, especially within an organization.
Connected App in Anypoint Platform: A configured connected app in Anypoint Platform is crucial, as it will be utilized for deployment purposes.
Secrets Management: Deploying MuleSoft applications often requires secrets like API keys or credentials. Familiarize yourself with GitHub Secrets for secure storage and usage.
Configuring a simplified reusable workflow
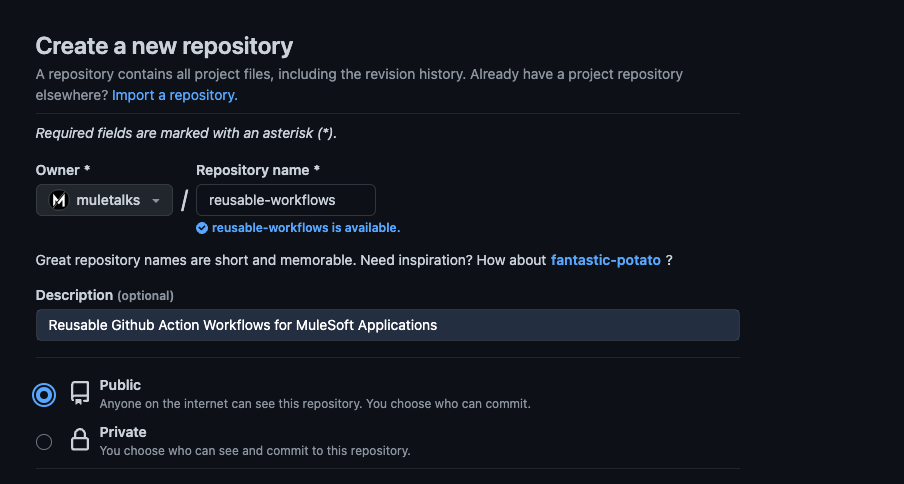
Start by creating a new repository dedicated to managing reusable workflows. This repository can be either public or private. In our case we will create a public repository.
Next, we'll establish a basic workflow that can be triggered by other workflows using on: workflow_call. The trigger will utilize workerType and workerCount as input fields, which can either have default values or be overwritten by the calling parent flow. The complete reusable workflow we'll be leveraging can be found here.
# This is a reusable workflow that deploys the project to DEV environment
# It will trigger the reusable workflow and pass the input parameters to it
name: Deploy the Project to DEV environment

# Trigger when being called from another workflow
on:
  workflow_call:
    inputs:
      workerType:
        required: false
        type: string
        default: "MICRO"
      workerCount:
        required: false
        type: string
        default: '1'
YAML
Now we can take a look at the Job and the required steps in order to build and deploy the project to CloudHub. Our job "build-and-deploy" contains 6 steps:
Checkout the Repository: This step fetches the latest code from your GitHub repository and places it in the GitHub Actions runner's workspace, ensuring the most recent version is used for the subsequent steps.
Set up Java JDK: This installs the Java JDK v11 using the Temurin Distribution, a prerequisite for many Java-based applications and tools.
Set up Maven: Here, Maven v3.6.3 is installed. Configuring caching is crucial as it helps reduce build times by reusing previously downloaded dependencies, making the entire process more efficient.
Build Project: This step compiles the code and builds the artifact. Notably, it skips Munit tests, focusing solely on the build process.
Get Artifact Name: This extracts the application's name from the POM file, which is essential information needed for the deployment phase.
Deploy to DEV: The built application is then deployed to the CloudHub DEV environment. This step utilizes provided variables and secrets to ensure a secure and accurate deployment.
jobs:
  # Build and deploy to DEV environment
  build-and-deploy:
    runs-on: ubuntu-latest

    steps:
      # Checks-out the repository under $GITHUB_WORKSPACE, so that the job can access it
      - name: Checkout Repository
        uses: actions/checkout@v3

      # Installs Java JDK v11 with Temurin distribution
      - name: Set up Java JDK 11 with Temurin
        uses: actions/setup-java@v3
        with:
          distribution: "temurin"
          java-version: "11"
          cache: "maven"

      # Installs Maven v3.6.3
      - name: Set up Maven
        uses: stCarolas/setup-maven@v4.4
        with:
          maven-version: 3.6.3

      # Builds the mule artifact using Maven
      - name: Build Artifact
        run: |
          mvn package -DskipTests=true

      # Reads artifactId from POM file and sets it as an environment variable
      - name: Get Artifact Name
        run: echo "ARTIFACT_NAME=$(mvn help:evaluate -Dexpression=project.artifactId -q -DforceStdout)" >> $GITHUB_ENV

      # Deploy to Cloudhub DEV Environment
      - name: Deploy to DEV
        env:
          ARTIFACT_NAME: ${{ env.ARTIFACT_NAME }}
          CONNECTED_CLIENT_ID: ${{ secrets.MULETALKS_DEPLOYER_PREPROD_CLIENT_ID }}
          CONNECTED_CLIENT_SECRET: ${{ secrets.MULETALKS_DEPLOYER_PREPROD_CLIEN_SECRET }}
          ANYPOINT_ENV: DEV
          WORKER_TYPE: ${{ github.event.inputs.workerType }}
          NUMBER_OF_WORKERS: ${{ github.event.inputs.workerCount }}
          REGION: eu-central-1
          BUSINESS_GROUP: muletalks
          ANYPOINT_PLATFORM_URI: https://anypoint.mulesoft.com
          ANYPOINT_ANALYTICS_URI: https://analytics-ingest.anypoint.mulesoft.com
          ANYPOINT_PLATFORM_CLIENT_ID: ${{ secrets.MULETALKS_ANYPOINT_PLATFORM_CLIENT_ID }}
          ANYPOINT_PLATFORM_CLIENT_SECRET: ${{ secrets.MULETALKS_ANYPOINT_PLATFORM_CLIENT_SECRET }}
        run: |
          mvn deploy -DmuleDeploy \
          -Dapplication.name="$ARTIFACT_NAME-v1-dev" \
          -Danypoint.platform.muletalks.connectedapp.client_id=$CONNECTED_CLIENT_ID \
          -Danypoint.platform.muletalks.connectedapp.client_secret=$CONNECTED_CLIENT_SECRET \
          -Danypoint.muletalks.env=$ANYPOINT_ENV \
          -Danypoint.muletalks.workertype=$WORKER_TYPE \
          -Danypoint.muletalks.numberofworkers=$NUMBER_OF_WORKERS \
          -Danypoint.muletalks.region=$REGION \
          -Danypoint.muletalks.bg=$BUSINESS_GROUP \
          -Danypoint.platform.analytics_base_uri=$ANYPOINT_ANALYTICS_URI \
          -Danypoint.platform.base_uri=$ANYPOINT_PLATFORM_URI \
          -Danypoint.platform.muletalks.client_secret=$ANYPOINT_PLATFORM_CLIENT_SECRET \
          -Danypoint.platform.muletalks.client_id=$ANYPOINT_PLATFORM_CLIENT_ID \
          -DskipTests=true
YAML
Great! So now we have successfully configured a reusable workflow that should be available to all your MuleSoft repositories.
Building a MuleSoft App with a Parent Workflow
For this demonstration, we've built a rudimentary "Hello World" application. You can use our example as a start. Each MuleSoft application should maintain a separate parent workflow, stored in the root directory as: root/.github/workflows/{workflow-name}.yml.
Let's explore the example workflow configuration that is part of our MuleSoft application:
On Push: This trigger activates the workflow whenever there's a push to the 'develop' branch.
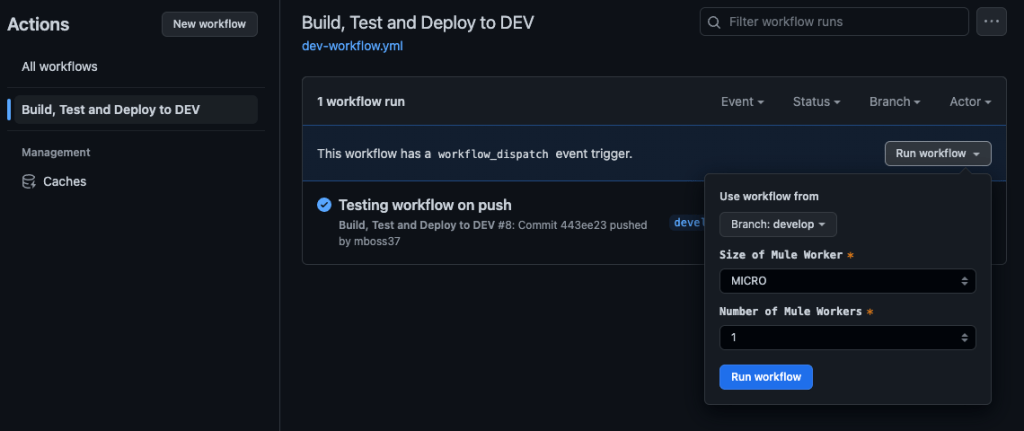
On Workflow_Dispatch: This is a more interactive trigger, allowing users to manually initiate the workflow. It's especially useful when users need to specify certain parameters, such as 'workerType' and 'workerCount'. For ease of use, these inputs are configured as dropdown choices, letting users select from predefined values.
# This is a parent workflow

name: Build, Test and Deploy to DEV

on:
  # Trigger the workflow on push
  push:
    branches:
      - develop

  # Allows you to run this workflow manually from the Actions tab with input parameters
  workflow_dispatch:
    inputs:
      workerType:
        description: 'Size of Mule Worker'
        required: true
        type: choice
        options:
          - MICRO
          - SMALL
          - MEDIUM
        default: MICRO
      workerCount:
        description: 'Number of Mule Workers'
        required: true
        type: choice
        options:
          - '1'
          - '2'
          - '3'
          - '4'
        default: '1'
YAML
In the next section of the parent workflow, we delve into the more interesting parts. Within the 'jobs' section, you can call another workflow using the 'uses' parameter. In our example, we point to the reusable workflow we set up earlier. It's crucial to specify the correct path to the reusable workflow, including the branch where it's stored (line 36). Failing to mention the right branch will cause the Action to not locate the reusable workflow, leading to an error.
We also pass the 'workerType' and 'workerCount' as inputs to the reusable workflow, allowing them to replace any default values.
jobs:
  workflow:
    # Make sure to add the right path to the reusable workflow.
    uses: muletalks/reusable-workflows/.github/workflows/dev-reusable-workflow.yml@master
    secrets: inherit
    with:
      workerType: ${{ inputs.workerType }}
      workerCount: ${{ inputs.workerCount }}
YAML
That's it! Now we have everything in place and can start testing the complete set up.
Testing the Solution
Once you've integrated the centralized GitHub Actions workflow with your MuleSoft application, it's essential to validate that everything functions as intended. At a high level, here's what's happening:
When an event (like a push or manual trigger) occurs in your Mule application, the parent workflow is activated. This parent workflow then makes a call to the reusable workflow, which in turn executes the job. The process can be visualized as:
MuleSoft Application
│
└── Parent Workflow (Triggered on Push or Manual)
│
└── Calls Reusable Workflow
│
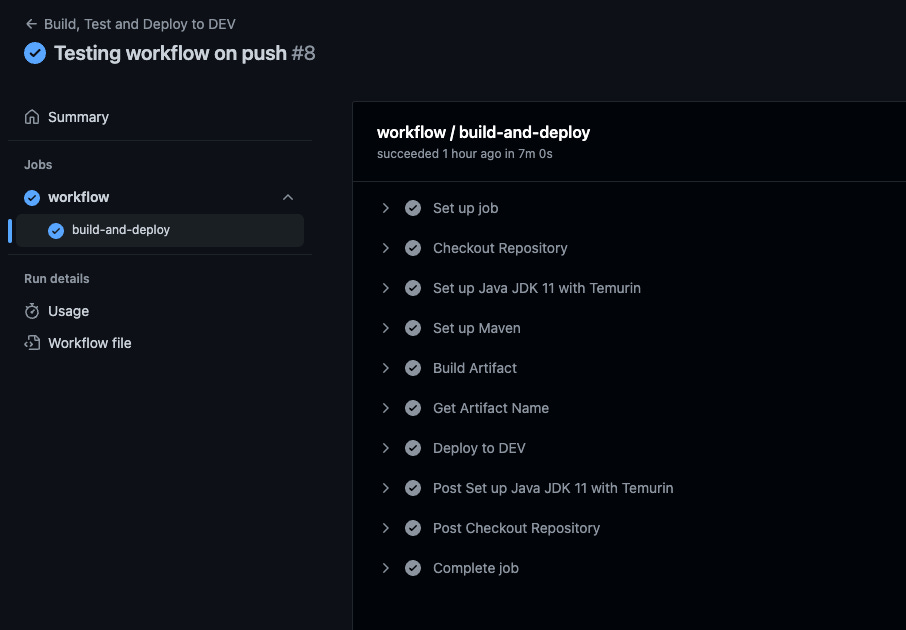
└── Executes JobTriggering the Workflow on Push
To test this, simply introduce a modification to your MuleSoft application and push the change to the develop branch. If your workflow is set up correctly, this action should initiate the workflow like in our case below.
Note: If your setup uses pull requests and restricts direct pushes to the develop branch, the workflow will still be triggered. This is because merged pull requests will automatically initiate a push to develop.
Triggering the Workflow Manually
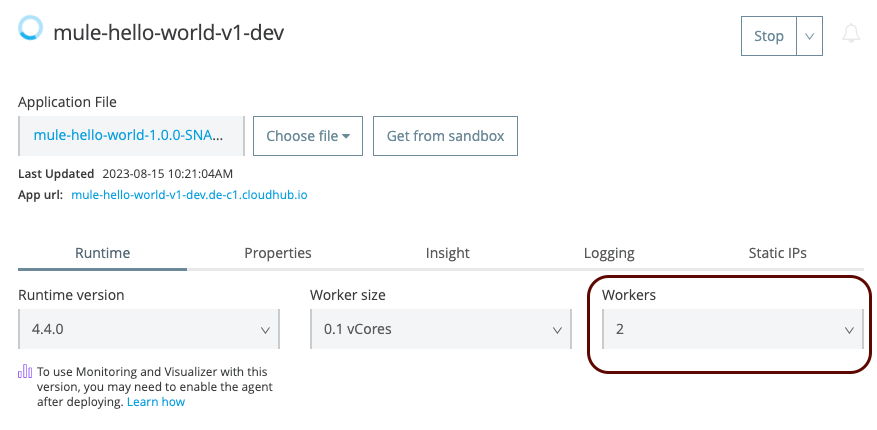
With the workflow_dispatch trigger configured, you gain the flexibility to manually initiate the workflow. This also allows you to specify parameters, such as the size and number of workers needed for the MuleSoft application. For demonstration purposes, let's choose 'MICRO' for the worker size and set the worker count to 2.
Below is a screenshot showcasing the MuleSoft application after it's been successfully redeployed, now reflecting the updated worker count of 2.
Wrap Up
"In the vast galaxy of DevOps, it's not just the tools that count, but the alliances we forge. Stay on target, collaborate, and always get the job done. This is the way!"
Boba Fett (Inspired)
In the ever-evolving landscape of DevOps, the need for efficient, streamlined, and scalable solutions is paramount. GitHub Actions offers a powerful platform for automation, and when combined with MuleSoft's integration capabilities, the possibilities are vast. Through this guide, we've explored the challenges of distributed workflows and the immense benefits of centralizing these processes. By adopting a centralized GitHub Actions workflow for MuleSoft projects, organizations can achieve greater consistency, security, and collaboration, all while optimizing resources.
Remember, the true power of DevOps lies not just in automation but in the collaboration and synergy it fosters among teams. By leveraging reusable workflows, you're not only streamlining processes but also fostering a culture of shared knowledge, best practices, and collective growth.
Join the Conversation!
We've delved deep into the world of GitHub Actions and MuleSoft, exploring the power of centralized workflows. But the journey doesn't end here. We'd love to hear from you!
Share Your Experience: Have you implemented a similar solution? What challenges did you face, and how did you overcome them?
Ask Questions: Not clear on something? Drop your questions below, and let's get the conversation started.
Spread the Knowledge: Found this guide helpful? Share it with your colleagues and friends. Let's empower more developers to streamline their DevOps processes.
Remember, every shared experience and piece of knowledge contributes to the growth of the community. Let's learn and grow together!
Reference Assets
For those looking to delve deeper or replicate the processes discussed in this post, I've provided a collection of assets that were used and referenced throughout. Here's a consolidated list for easy access: